First Daring Bakers Challenge, and a challenging one! This month's challenge was brought to us by the adventurous Hilda from "Saffron and Blueberry" and Marion from "Il en faut pour etre heureux". They have chosen a French Yule Log by Flore from "Florilege Gourmand". I hadn't figure out until I was about to post this entry and by looking for the links, that the recipe comes from one of my absolute favorite pastry sites!! I have always admired Flore's work and her ability to explain the recipes in a simple and clear way. I tried many of her recipes and they are all perfect. She is good at what she does, and doing this challenge is more than an appreciation to all her efforts.
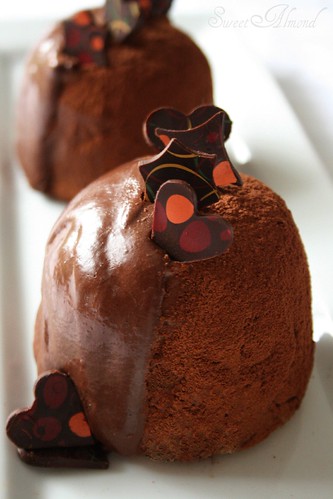
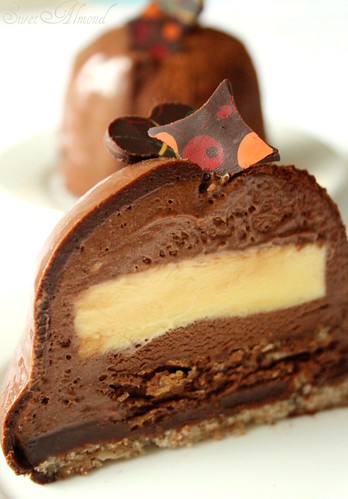
This Yule Log is an entremets like dessert. I must say that entremets are my favorite kind of desserts. I love them because of their different layers and textures. This particular one has 6 different tasty layers: a chocolate mousse, a creme brulee insert, a praline crisp, a chocolate caramel ganache, a dacquoise and a chocolate glaze. I thought the final result would be very chocolatey, but it came out balanced and not too sweet. The creme brulee insert took this dessert to a whole new level (may be because I'm a creme brulee addict!). I never thought I could use a creme brulee inside a cake!
I pretty much followed the recipe and made very little changes (used a hazelnut dacquoise instead of an almond one). Everything in the recipe worked fine. The only thing that I wasn't happy about was the final glaze. It was OK until I added the gelatin or agar agar actually. As soon as the gelatin was added the mixture became grainy and lost its shine. I had to add boiling water to fix it but still the glaze didn't come out smooth and shiny, and since I added water the color became lighter, more like a milk chocolate glaze.
As you may have noticed also, I didn't exactly make a "yule log" but rather individual domes. I did this for 2 reasons:
1- I bought online a round yule log mold, was extremely excited about it and couldn't wait to get it. I've always wanted to own one and this challenge was a reason enough for me to order this pan.I waited patiently for days and days. Then after about 2 weeks, I thought something might be wrong with this order. I called the dealers and guess what: they said the product is out of stock and will be available on.............January 4th!! Wait wait wait, you cannot do this to me, I haven't even been notified about that!! I need this for my daring bakers challenge, why is this happening??!! I wished the whole thing was a nightmare but unfortunately it wasn't, I had to deal with the reality : I had to come up with another idea. I thought about using the loaf pan but wasn't excited about the shape. So, I ended up using small trifle pans. The shape didn't come out perfect, but I had no better choice.
2- The other reason was dealing with the size of the log. Using these small individual pans was better actually because they are perfect for two (I consider my self a "half human" actually because I eat so little!!). I was wondering before making the recipe who will eat this huge dessert?? I was pretty sure I would take 2 or 3 bites and stop right there, so my husband will end up eating the whole thing!! no, not good! After all, the unfortunate "pan" story wasn't that depressing.
Overall, this first experience was fun and a tasty one and although the recipe seems complicated, it truly isn't. Now, I can't wait for the next challenge!


