What can I say about Algerian cookies: beautiful, extremely tasty, rich, distinctive and definitely different from any other cookie you've ever seen or tasted. There are many different types of cookies depending on the region. Algeria is a big country (the 2nd largest in Africa) with so many different cultural and culinary traditions. But most of these delicacies originate from the capital Algiers. I don't know exactly where all these cookies are originally from (may be some Turkish influence), but they sure are delicious looking and tasting. Most of these cookies are made with almonds and some other nuts (walnuts, pistachios...). Sometimes made entirely with nuts and others include an outer layer of different types of doughs. The main flavorings are orange blossom water or rose water and citrus (lemon). Sometimes we add vanilla for extra flavor.
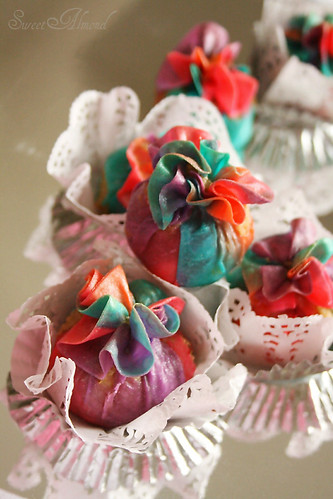
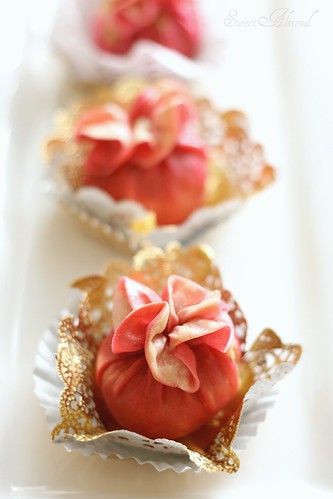
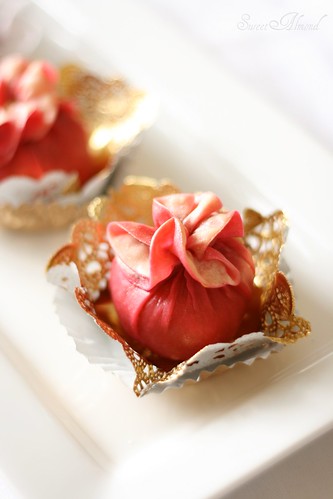
These particular cute little ones are called "The bride's Package" I'm not sure though if "package" is the right word. I couldn't find the direct translation. In Algeria, the bride would get a big basket full of different things brought by the groom or the groom's family. They would bring this basket (pink or white usually) and show it on the wedding day to all the guests ( I know it sounds weird!). I always found it very funny when they start to grab the stuff (shoes, handbags, perfumes...etc), say the name of the object and show it to everybody. I am not sure if they're still doing it to this day but I bet some regions are.
The cookies are made with a very simple dough, rolled out very thinly. You can color the dough whichever way you want, make different colors, strips...etc. They are then rolled out all together. After the dough is rolled out (using a pasta machine), it is cut into circles. A ball of filling is put in the middle of the circle then closed to form a surprise like package. They are then cooked and plunged in an orange blossom simple syrup or honey.
The cookies are made with a very simple dough, rolled out very thinly. You can color the dough whichever way you want, make different colors, strips...etc. They are then rolled out all together. After the dough is rolled out (using a pasta machine), it is cut into circles. A ball of filling is put in the middle of the circle then closed to form a surprise like package. They are then cooked and plunged in an orange blossom simple syrup or honey.
I'll try to explain this recipe as clearly as I can which is kind of hard without any illustration. while I'm working, especially with recipes that require a bit of attention, I cannot handle the camera. I have an issue concentrating on two different things I guess! But if you read the recipe and still have questions don't hesitate to ask, I would be more than happy to help.
Almond Surprises Courtesy "Algerian Heritage" :)
Dough (Outer layer)
note I'm using a "measure" which means use the same cup to measure the different ingredients. Could be a cup, 1/2 cup....etc. For instance if you use the "1/2 cup" you would need a 1/4 cup of the clarified butter. Also, I usually use the food processor to make the dough.
3 measures all purpose flour
1/2 measure clarified butter
pinch of salt
1 measure orange blossom water
In a bowl, mix the flour, clarified butter and salt. Work the ingredients between your hands until crumbly. Start adding the orange blossom water slowly until you get a dough. It shouldn't be very soft. Add enough water to make a dough that is not sticky. If using the food processor, follow the same instructions. Divide the dough into balls and color each one with the desired food coloring. It takes some time for the color to get incorporated in the dough, just keep working the dough with your hands and be patient! Keep the dough balls in a ziploc bag and let them rest for at least 30 minutes at room temperature.
Almond Filling
300g ground blanched almonds
180g powdered (confectioner) sugar
1 large egg
Zest of 1 large lemon
1/2 tsp vanilla extract
Mix all the ingredients until you form a dough. It shouldn't be sticky to the touch. Form into a walnut size balls and keep in the fridge until ready to use.
Orange blossom & Lemon Syrup
2 cups granulated sugar
5 cups water
1/4 cup orange blossom water
2 TBsp lemon juice
Lemon peels from 1 large lemon
In a sauce pan, mix the sugar, water and the lemon peels. Bring to a boil and let simmer for 15 to 20 minutes. Off heat add the orange blosoom water and the lemon juice. Cover and let completely cool. The syrup should be cold when used.
Preparation of the cookies
Prepare your pasta machine. If you don't have one, you could use a rolling pin, but I don't think the result will be the same since we want the dough to be very thin. Plus, the machine makes the work much easier and faster.
If you want the cookies to be just one color (like the pink ones I made) there won't be too much work to do, you would put the dough through the machine and roll it out on the thinner setting.
If you want the multi colored stripped dough, here is what you would do: make strips out of the different colored doughs. Stuck the strips by alternating the colors. Make sure they are well glued to each other, you could use some water to make them stick (go easy on the water please!). Start rolling the strips on the medium thickness of the machine, then roll it again on the thinnest setting. while you're rolling and working, use some corn starch to make the dough dry out a little bit. Spread some corn starch on your work surface and lay the rolled out dough. Let it sit for 3 to 5 minutes, then cut out circles about 5 inches in diameter. Let the circles dry out another 5 minutes.
Put in the middle of each circle of dough a ball of filling and close the whole thing gently to form a
surprise package or some kind of a basket. Press gently so the dough in the middle stick well and won't open up during baking. Be careful not to press hardly otherwise the dough will get cut and the filling will come out during baking.
finish making all the cookies and arrange them on a sheet pan lined with parchment paper. Let the cookies sit for at least an hour before baking. The more they sit the better they will keep their shape while baking.
Bake the cookies in a 320 f preheated oven for 20 to 25 minutes. They shouldn't get brown at all to keep their nice color. As soon as they come out of the oven, plunge them in the cold syrup. Let them soak the syrup for 1 to 2 minutes. Arrange the cookies on a cookie rack with a baking sheet underneath it to drain the excess syrup.
Note: You can use Honey thinned with orange blossom water instead of the simple syrup. Just heat the honey and orange blossom water and let the mixture cool. The consistency of the honey should be like a simple syrup.
these are really interesting. IO enjoy reading about different cultures and baking :) these cookies look so colourful and nice. You did a fine job :)
ReplyDeleteOh they are amazing, thank you very much for the recipe! I have one question; how come the pink ones have different colour, I mean colourless, in the inside? Because when I look at the multi coloured ones, inside and outside of the dough is same whereas the pink ones look like they been brushed with colour on the outside, you see what I mean?
ReplyDeletewooww looks delicious!!
ReplyDeleteI should try it!
Thanks for the recipe
nice colors
Snooky doodle: thank you so so much!!
ReplyDeleteZeynep Seda: for these particular ones I left half the dough white and colored the other half, rolled out the first color, then the second one then I put one on top of the other and did the last rolling (on the thinnest setting) with both doughs one on top of the other. I hope you got the idea, I know without illustration it is hard to explain but hopefully you got it :)
asya yusof: thank you for visiting!
ReplyDeleteYour photos and deserts look absolutely gorgeous, great photography too! :)
ReplyDeleteHello Khadidja
ReplyDeleteBeautiful work as always!!!!!!!
Thank you
I can't wait to make these, they look beautiful and I'm sure they taste supberb!
ReplyDeleteAlly
Thanks Khadidja for this recipe.
ReplyDeleteI am very excited to make those, they look wonderful, a very good choice for our first challenge, good luck everyone!
I am so impressed with your work. You are a wonderful artist. Machallah!
ReplyDeleteCan't wait to try this as part of the Walima challenge this month!
this is an interesting recipe! Don;t think I will be making it for now but thanks for sharing. It's beautiful. :)
ReplyDeleteEsalaams,
ReplyDeleteYour blog is very nice ... glad I found it. Many blogs with recipes in French but not too many in English. I am sure English readers would love to share in the Algerian recipes as well enchallah!
wow!! what a beauty! thank you so much for sharing this recipe, I am going to try it out. Your blog (and Flickr photos) are amazing!
ReplyDeleteThis comment has been removed by a blog administrator.
ReplyDeleteI have been studying and learning Algerian cooking from my fiance, and was told this a called قنيدلات, or Guenedlat/Knidlette/Qnidlat. I have seen them made both opened and sealed at the top. Wonderful sweets! Your pictures are lovely!
ReplyDelete